***Come link up your crafts to this week's party!***
Showing posts with label sewing. Show all posts

Thursday, April 25, 2013

I'm back! And...DIY Curtains!

Hey Everyone! I'm so glad to be back! Our life is still crazy, but I have managed to get on top of things enough to actually get a project posted this week!

We're still getting settled into our new home, and the boys are getting settled with us as well. Since we moved into a bigger house, and now have two additional members of our family, we've realized we're short a few pieces of furniture and a few other things. So...the natural end of this story is that I have been to Ikea several times in the last few weeks. And during my first visit in the series (to buy rugs), I found out that Ikea sells FABRIC!

I found this fabric that I loved - and it was only $7.99/yard!


This fabric is the perfect colors for my living room, and I've been wanting to change up my curtains. The fabric is heavy like home decor fabric, so it's perfect for curtains!

Last weekend my mom was visiting so we went back to Ikea for some more furniture AND to buy the fabric for my new curtains!

The fabric is 59' wide, so I used it as-is for the width of the panels. I ordered 5 yards total, so I had 2.5 yards for the length of each panel. I laid the fabric out, cut it in half, and then my mom ironed it and ironed down the hems. (Meanwhile I was upstairs failing at putting together a shelf for the boys' toy room). There's a 2 or 3 inch pocket at the top, 1/4-inch hem on the sides, and about a one-inch hem at the bottom.


(The fabric is folded in half lengthwise here)

After it was all ironed, my mom sewed the ironed hems (and there was me, organizing toys, having given up on the bookshelf - which Handy Andy put together in like 10 minutes). And that was it, this project was so simple and quick! I spent $42 total, fabric and thread. That's a steal for curtain panel! My old ones were $50 per panels!

Here they are:


I love the pattern so much! 
And you can see a peek of the awesome orange rug I also got at Ikea - for only $20!

By the way, no, I am not being paid to rave about Ikea - I just happen to be really happy with the products they are carrying lately! :)

Thanks for stopping by!


Thursday, March 14, 2013

T-Shirt Envelope Pillow Case

We've been super busy lately, so I haven't been getting too many projects done. Fortunately, I still have a few projects left from my handmade Christmas that I haven't posted. Like this one...

T-Shirt Envelope Pillow Case


I made this pillow case for my friend from her brother's Army t-shirt. It was at least an XL, so there was plenty of fabric. I made the case to fit a 17 or 18 inch throw pillow. 

This pillow case is made from three parts. The first square piece was cut from the front of the shirt to fit the pillow, with some seam allowance (whatever amount you're comfortable with). The two back pieces need to be cut so they overlap in the middle, but measure the width of the pillow. I used the back of the t-shirt for these pieces. To sew, I laid all the pieces right sides together and sewed the outsides.

For a detailed tutorial, you can see this one from Turning a House Into a Home, because the way she put her's together is pretty much the same. 

The pillow case turned out great and my friend loved it! It would be easy to do with any extra fabric you might have around as well. 

Thanks for stopping by!


Thursday, March 7, 2013

New Glasses & A DIY Glasses Case

Hey All! Did you see this picture I posted on Twitter and Instagram this week?


Well, I got some new glasses from Firmoo.com and they came in while I was at work, but Handy Andy was at home...and apparently he decided he wanted to try them on...

Anyway, Firmoo contacted me a few weeks ago to try out a pair of their glasses, and I'm really glad I did! I decided to take a little [fashion] risk and choose a pair of glasses that are different from any style I've ever worn before. But they were free, so there's no time like the present! I chose the Chocolate Brown Full Frame acetate glasses.


I actually really love them! Overall, I had a good experience with Firmoo. After choosing my frames, I just entered the numbers on my script from my eye doctor and ordered. All the glasses they have are really inexpensive, and I was a little worried about the quality, but they are really nice! They came ten days after I placed my order, along with a case, cleaning cloth and keychain screwdriver. 
And, guess what?! You could get a free pair of glasses too! Firmoo offers a First Pair Free program where you can get the first pair of glasses you order free, so go check it out!

Also, I decided to make a case for my new glasses, so here it is. I used some patterned fabric for the outside, and some white fleece for the inside.


I measured my glasses and added some seam allowance, I also added about an inch and a half for a flap on just one piece of fleece and one piece of the patterned fabric. Before sewing, I laid the patterned fabric right sides together and then put the fleece on either side.  Then I sewed the sides and the bottom, turned it right-side out and finished the edges of the flap. I added a button as well, but I don't have any instructions for that because, apparently, I'm terrible at cutting and finishing a button hole. If I can figure it out, I'm confident you can.


This was such a quick project, and really easy. I love how it turned out, and now I have a cute case for my new glasses!


Thanks for stopping by!


**I received a free pair of glasses from Firmoo to review. All opinions expressed on this blog are my own.

Friday, November 30, 2012

DIY Infinity Scarves

As you may know, if you come visit me regularly, I am doing this handmade Christmas thing. So far, I've shared the wristlets and personalized notebooks for my nieces, as well as the rustic jewelry holders for my mom and sister-in-law. Well apparently, I unconsciously decided that my mom and sister were going to get matching presents this year. First the jewelry holders and now these...

DIY Infinity Scarves

I would love to show you a tutorial, but there are already so many out there, and honestly I just referenced a few different ones and then added a little of my own thing. Here's what I ended up with:


Zebra print for my mom.


Pretty flowers for sister.


Another animal print for mom (she really loves animal print).

Here are a few tutorials I suggest looking at:

I got awesome deals on some remnant fabric at Hobby Lobby, so each one is a different length, but they all turned out great!

How is your Christmas list coming?

Thanks for stopping by!


Thursday, November 1, 2012

[Simple] Wristlet DIY

Normally I'm all about not getting all excited about Christmas until Thanksgiving is over. But this year, I decided to do handmade gifts for most of my friends and family members [which I may regret soon].

Anyway...so, like a good crafter, I scoured Pinterest for some good gift ideas to get my creative juices flowing. I gathered a few ideas, came up with some of my own, and am feeling alright about this handmade Christmas business...for now. So, be prepared, I'll be sharing my handmade Christmas-gifts-to-be with you over the next few weeks.

The first thing on the list was to make wristlets for my two older nieces [ages 8 & 6]. I found some really cute heavier duck fabric on clearance at Hobby Lobby, along with a remnant of cream canvas fabric that I used to line the inside.


I think I spent $5 on all of this fabric - and actually I had a gift card, so I really spent $0 on this fabric! Score. I already had some coordinating zippers from my mom/grandma's sewing box.


Yup, these zippers have been around for a while. Thanks, Grandma, for buying these back in the day...and thanks, Mom, for not sewing much so I could use these today.

Alright, I'll get on with it...


First, cut two pieces of the patterned fabric and two pieces of the off white, 5" x 8" [be sure to cut your long side according to your zipper]. Don't forget to iron your fabric. Layer the lining on the plain or inside of the patterned fabric, pin together.

Now, I had never sewn a zipper up to this point, so I used this tutorial to help me out, so head over there if you need help, because I for sure cannot give you a better tutorial on that.

After sewing the zipper, open up the zipper, then sew the other sides together [fabric is still pattern sides together, lining out, zipper to the inside] - leaving a small opening near the top on the side you want the wrist strap. Opening the zipper is key, so you can turn the pouch right-side-out later without a struggle.


For the strap, cut a strip of fabric, about one inch thick and twice the length of your desired strap length, with a little seam allowance [I cut mine about 10.5 inches]. Fold each cut edge into the middle and iron them so they stay down. Then fold the strap in half where the two edges meet, iron again. Then sew down the length of the strap.


Insert the strap through the opening in the side of the pouch, with the loop on the inside. Tuck the loop of the strap inside, so it gets sewn on straight.


Sew the opening shut with the end of the strap pulled through. Then trim the corners of the pouch, so they will look better when you turn them out.

Turn the pouch right-side-out and...done!


These are far from perfect, but that's the beauty of creating handmade gifts...and creating them for kids! :)

Sorry if that was a cumbersome tutorial! Hopefully it was helpful!

Thanks for stopping by!


Thursday, January 19, 2012

Pinterest Thursday: Burp Cloths

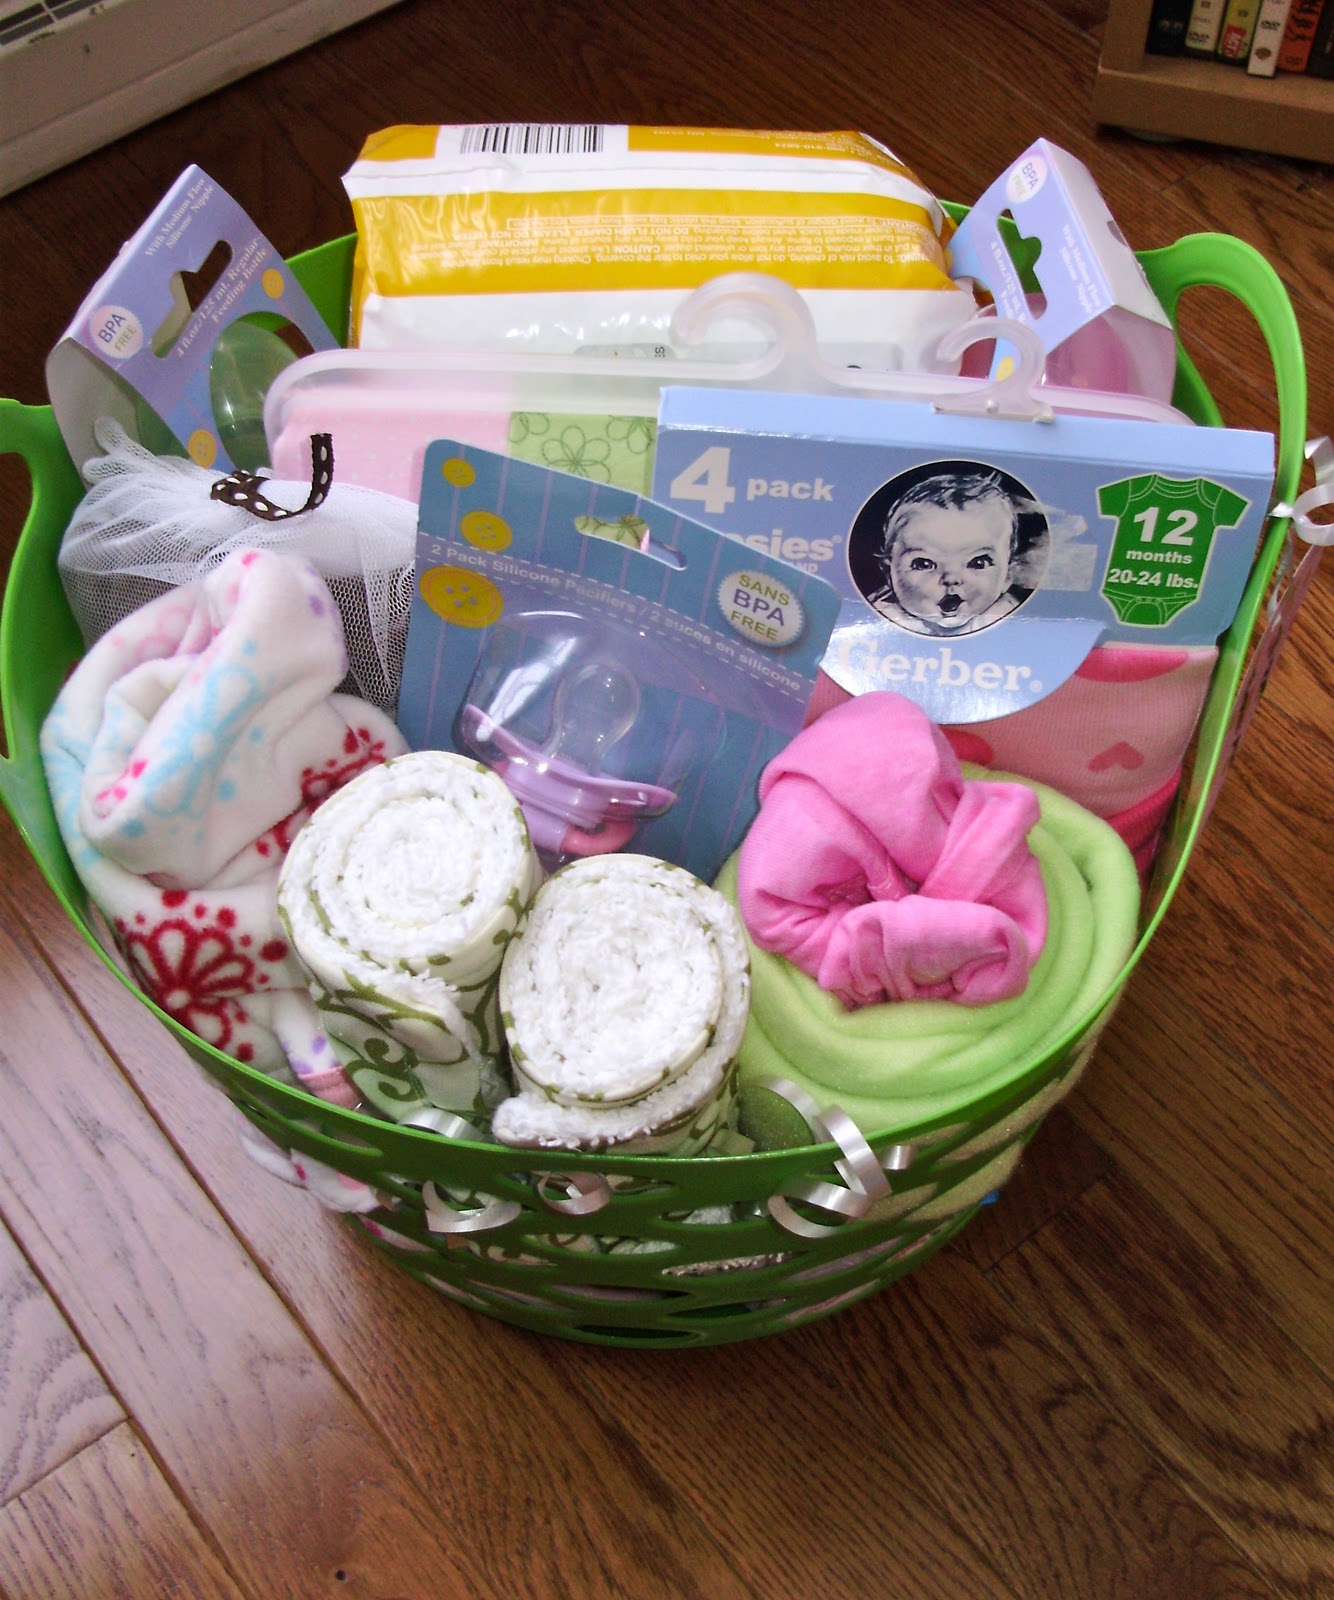
A coworker of Handy Andy's recently had a baby and they had a shower to which Handy Andy said "I'll just buy them some diapers for a gift." Um, no. What a perfect opportunity to explore Pinterest and get some ideas for a baby shower gift!

I found this tutorial for handmade burp cloths:


This project looked quick and easy, so I went to the dollar store and got a few white hand towels. I followed the tutorial using the towels and some green fabric I already had. I only used one towel for two burp clothes, so this project only cost me $1!


The lines aren't perfect, but these are really cute and they were so easy! I added them to a basket of other goodies in pink and green. Here's what I ended up with:


Happy Pinning and crafting!


P.S. Linking up to these parties:


button


Photobucket


shabby creek cottage

life by the book


Photobucket


http://www.thegrantlife.com/search/label/financial%20friday


One Artsy Mama


Country Momma Cooks


Saturday, December 10, 2011

Shabby Chic Christmas Decor

Lately I have been working on a Christmas package to send to a friend. She really loves the shabby chic look, but doesn't have anything in that style. She also really loves Christmas. So, I decided to make her a few things so she can start her Shabby Chic Christmas collection.

First I made some ornaments:


I covered four of them with book pages or scrapbooking paper using Mod Podge, and I covered one with burlap and some lace using hot glue. I tied ribbons to all of them and then sprayed them with glitter.


I was inspired by Chrissy from The Taylor House to make this ornament. I used some burlap, dollar store snow flakes and scrabble tiles to make it:


I also used this tutorial as inspiration and made this little fabric and burlap Christmas tree:


For this, I cut strips of fabric and burlap, sewed them together (a little staggered) and then wrapped it around a styrofoam cone from the dollar store, using hot glue. After that, I wrapped a chipboard star with burlap and hot glued it to the top. Then I took some berries from a flower arrangement I had and glued them as ornaments. As a finishing touch, I sprayed it with glitter.

Finally, the project I'm most proud of -- burlap stocking. I used this tutorial, burlap I had, fabric from the thrift store (as lining and cuff), vintage buttons, and one of my Christmas stockings as a pattern.


I'm so proud of this stocking! Mostly because it was another successful sewing project, and it's so cute!

So there they are - my homemade shabby chic Christmas decorations. I hope my friend likes them!

What is your Christmas decorating style?


P.S. Linking up here:

Button
Link Party


Tip Junkie handmade projects


hbcbutton


{Junk in their Trunk}


button


Photobucket


shabby creek cottage


Photobucket