***Come link up your crafts to this week's party!***
Showing posts with label jewelry. Show all posts

Thursday, April 4, 2013

Guest Post: Washer Pendant Necklace

Hey All! I'm still trying to get my life under control with our new little additions, so in the meantime one of my favorite bloggy friends is here to share an awesome project!

 Washer Pendant Necklace
by Karen from QuintonWench

The humble washer .... a plenty lying around in my husband's garage waiting for a DIY use.

 photo pendant1_zps30c105f4.jpg


I rarely step foot in the garage, but I'm glad I did today, because I have found a 'Karen' use for one...
A washer pendant...

 photo pendant7_zps2ffd37a6.jpg


First I punched out a circle from a random piece of patterned paper - luckily I have a hole punch the same size as the washer.

 photo pendant2_zps502b0aec.jpg
 photo pendant3_zpsafdbd4d1.jpg


I stuck the paper circle to the washer with Mod Podge and once dry I used a craft knife to cut out the centre. Then I brushed on a top coat of Mod Podge.

 photo pendant4_zps3704105a.jpg


Finally, I added some black cord and a bead to finish it off.

 photo pendant5_zps24472589.jpg
 photo pendant6_zpsedcd3da8.jpg

What a great project - I love how it turned out! Thanks Karen!

Thanks for stopping by!


Thursday, November 15, 2012

Barn Window Jewelry Holder

Happy One Week until Thanksgiving!! Are you getting excited? Planning your menus? Well I'm doing no planning, since we are going back to my parents' house for Thanksgiving this year, and my mom takes care of the food shopping and menu hoopla. We haven't been at my parents' house for Thanksgiving in several years, so I'm pretty excited.

Also, since I don't have any hostess planning going on right now, I've had some time to get some more homemade Christmas gifts made. This week I made jewelry holders for my mom and my sister. They both love jewelry, I am the odd one out there. They also both have a vintage-y, country-chic decorating style, so I decided to combine those two loves and create country-chic looking jewelry holders for each of them.

I started with two barn window frames that I got from my parents' stock of "treasures," as well as some chicken wire that Handy Andy had (obviously he has that lying around, don't you??).


I removed some old nails that were still sticking out of the window frames, and then sanded the frames down. Then, I spray painted them -- man, I love spray paint, so easy.


They were a little splotchy, but that's fine because, after they dried I sanded them again and brushed some dark wood stain over them. (No, I did not do them Christmas colors on purpose, thanks to Handy Andy for asking. Those are colors they each use to decorate with often).


Once the stain dried, I finished them with Minwax Finishing Paste (love that stuff). Rubbing that on them lightened up the stain a bit too, I really like how the colors turned out. After that dried, I added the chicken wire to the back with a staple gun -- I suggest wearing gloves, I didn't and my fingers were killing me when I was done.

To finish them off, I added some lace and burlap embellishments, and some scrabble tiles to my mom's and...


Done!

These were pretty simple to make, and I think they will really love them...AND they are useful - score! I also bought some little hooks to add for them to hang their necklaces on, but I haven't gotten around to putting them on yet.
 
Are you making progress on your family Christmas list this year?

Thanks for stopping by!


Wednesday, September 26, 2012

Giveaway from LadyBugtole & CassElizaDesigns

Hello! I'm so glad you're back today because I have another giveaway for you to enter! Don't forget to enter the giveaways from PoppyDreamz and 2BeesPress while there is still time!

Today we have a giveaway from two shops!


Peggy...When did you start making scrapbooks & jewelry?
I starting doing scrapbooks 3 years ago, the first one was a gift for my daughter and I was hooked.
I've been doing some type of crafts for 30 years, I started doing jewelry about 7 years ago.


What is your favorite thing in your shop?
My favorite thing in my scrapbook shop is the pink rose album in the jewelry shop its the purple collage brooch.


What is your favorite way to spend a weekend?
The my favorite way to spend a weekend is with family and friends up North.


What is your favorite thing about birthdays?
My favorite thing about birthdays,( I don't have them anymore, LOL) but it would be to get together with family and friends.

Thanks Peggy! Up for grabs today is a $15 shop credit to LadyBugtole AND a $15 credit to CassElizaDesign - that's right, TWO winners today!


Ready, set...ENTER!


a Rafflecopter giveaway

Wednesday, April 18, 2012

Flower Bobby Pins

Happy Thursday All! I hope your week is going well! This week my project is super quick and simple, which is a huge bonus because we are crazy busy!

So, I'm growing out my bangs. Since my hair is curly I used to have to straighten them every day or they looked weird. Well, that's way too high maintenance for me, so I'm growing them out to avoid  dealing with them. Here's the problem with that, they aren't long enough yet and they're in my face all the time, which it super annoying. I've been pinning them back, but I wanted to add a little something so that my go-to hair style [not sure it classifies as an actual style] is not so boring.

Enter, the fabric flower. Seriously, I feel like you can class up just about anything with a fabric flower.

So, here's what I gathered:


1. Glue gun
2. Fabric scraps
3. Scissors
4. Bobby pins with round bezels from Hobby Lobby (I think I got a pack of them for $2)

Follow this or any of the other gazillion fabric flower tutorials on the web to end up with this:


Then put a generous glob of hot glue on the back center of the flower and press into the bezel, and you get this:


See, told you it was quick and simple...and cheap! Two dollars and ten minutes later, I had two new hair accessories. My kind of project.

Anyway, I hope you enjoyed this short-and-sweet post.

Have a lovely week!


P.S. Linking up here.

Thursday, November 3, 2011

Pinterest Thursday: Word Pendant Necklace

Happy Thursday! This week I decided to be adventurous and try something I've never done before -- Jewelry. Now, I've dabbled in a lot of crafts, but jewelry is one thing I know pretty much nothing about. But, it's my mom's birthday week, and I wanted to make her something special and she loves jewelry, so I gave it a shot.

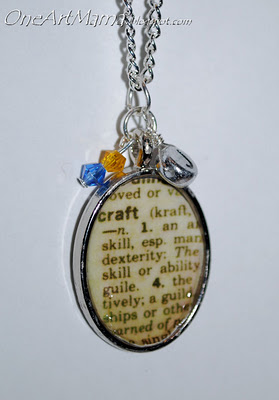
A few weeks ago Jaime from Crafty, Scrappy, Happy had a guest post from Amy over at One Artsy Mama on how to make this unique and way cute necklace:


How awesome is that?! By the way -- both those blogs rock, so go follow along!

The instructions Amy gave seemed simple enough, so I decided to try it! After all, Handy Andy wouldn't shy away from a project he'd never attempted before, so neither should I!

I went to Hobby Lobby (aka the best place ever) and spent way too long looking for these materials:


1. Chain $2.99
2. Cross Charm $0.99 (it was 50% off!)
3. Rectangle Pendant Bezel $1.99
4. Mod Podge Dimensional Magic $5.50

I brought the supplies home and then scoured my thrift-store dictionary for the perfect word. I decided on "family" for obvious reasons and a few other reasons. Amy took a picture of the page and then edited it on her computer, but since this dictionary was purchased for the purpose of crafting, I just used the actual page. I also used a brown ink pad to add a little big of an aged effect. Then I cut the page to the size of my pendant and used some glue to place it in there.


At this point, I decided to add some glitter, because that is just so my mom. I put some multi-colored glitter in there and then filled it with the Mod Podge Dimensional Magic.


This stuff dries clear, but takes three hours so it's not for the impatient (me). But, since I did this late at night, I just left it overnight. In the morning it looked like this:


It looks so cool! Then, I added a cross charm. Amy suggests using a jump ring, but I didn't want to buy a package of them when I probably wouldn't use them again. Instead I used some thin wire I had at home and wrapped it around a pen a few times to make a small loop (same idea as a key ring). I put the cross on there and then put that on the loop of the pendant. Add the chain and...


Mom's birthday present done! It was so easy, and you know if I said that, having no experience in jewelry making, then it's true. Now I have a unique and thoughtful gift to give my mom for only $12 (and that's if you don't already have the Mod Podge DM, which I didn't). Maybe a gift like this would be perfect for someone on your Christmas list...

Thanks so much to Jaime and Amy for sharing such a great tutorial!


P.S. Linking up with these fun parties - check them out!


Photobucket


shabby creek cottage

Button