***Come link up your crafts to this week's party!***
Showing posts with label scrapbook. Show all posts

Thursday, January 31, 2013

Project Throwback - Handmade Envelope Care Package

Confession: I have several projects to show you, but I apparently forgot how to schedule taking photos in the winter time to catch the good light so I don't have any photos of them yet. I hate that it's dark when I get home from work.

Anyway, I was thinking of some Valentine's crafts and I remembered a craft I did really early on in my blogging that I think would be so perfect for your Valentine's Sweetheart!

Handmade Envelope Care Package


 Step 1: Gather patterned paper, pencil, deconstructed envelope, tacky glue.


Step 2: Trace and cut envelopes, fold envelope flaps using a straight edge.


Step 3: Glue the side and bottom flaps together.
Step 4: Glue the top flap to the back of one envelop, stack all this way.


 Step 5: Finish it off with cute notes and candy!


There you have it: a perfect, thoughtful gift for your Sweetie! If you want to check out the original post, you can see it here.

Thanks for stopping by!
Have a great Friday and don't forget to stop back to party on Saturday!


Thursday, September 27, 2012

Giveaway from CherryPinkPrints

Today is the day -- it's my blog's one year anniversary! Make sure you go enter the other giveaways from Sunday, Tuesday, and Wednesday! We're just going to keep right on celebrating, and today we have a giveaway from...


Amelia...Tell us a little bit about yourself.
Hello I'm Amelia and I design and create my own digital art and scrapbooking materials. I'm married and live in London with my hubby and cat. I work full time as a graphic designer in London and spend my evenings working on the shop. 


When did you start making digital scrapbooking materials?
I started making scrapbooking materials a few years ago. For our honeymoon my husband and I went on an American east coast road trip for a month! When i got back i made a scrapbook of our trip. I designed my own banners and scrapbook papers for it and really enjoyed created all the bits. Then, in 2011 I decided to start up my own Etsy shop selling my designs. My style has changed a little over the years and now I'm heavily influenced by vintage ephemera and illustrations.


What is your favorite thing in your shop?
Tricky question! i think it might be my VINTAGE COLLAGE NOTECARDS as this was one of the first collage designs i did and i really love all the illustrations used. I have them printed and framed in my hallway.


What is your favorite way to spend a weekend?
Working in a busy city like London my favorite way to spend a weekend is in the Kent countryside. Its beautiful (even in all the rain!) and the south coast and views of Dover is stunning. I like going for long walks with friends and finishing up in a tea shop for a big piece of cake!


What's your favorite thing about birthdays?
I like to spend my birthday with my family and close friends. just a quiet meal followed by a big bit of cake! (incase you didn't guess, i'm a big fan of cake!) I always get loads of craft based presents which is brilliant as it shows just how well all my friends and family know me!

Thanks Amelia! I love those Vintage Collage Notecards...and pretty much everything else in her shop! And one lucky winner will receive a $20 shop credit!

Use the Rafflecopter widget below to enter, you know you want to!

a Rafflecopter giveaway

Wednesday, September 26, 2012

Giveaway from LadyBugtole & CassElizaDesigns

Hello! I'm so glad you're back today because I have another giveaway for you to enter! Don't forget to enter the giveaways from PoppyDreamz and 2BeesPress while there is still time!

Today we have a giveaway from two shops!


Peggy...When did you start making scrapbooks & jewelry?
I starting doing scrapbooks 3 years ago, the first one was a gift for my daughter and I was hooked.
I've been doing some type of crafts for 30 years, I started doing jewelry about 7 years ago.


What is your favorite thing in your shop?
My favorite thing in my scrapbook shop is the pink rose album in the jewelry shop its the purple collage brooch.


What is your favorite way to spend a weekend?
The my favorite way to spend a weekend is with family and friends up North.


What is your favorite thing about birthdays?
My favorite thing about birthdays,( I don't have them anymore, LOL) but it would be to get together with family and friends.

Thanks Peggy! Up for grabs today is a $15 shop credit to LadyBugtole AND a $15 credit to CassElizaDesign - that's right, TWO winners today!


Ready, set...ENTER!


a Rafflecopter giveaway

Sunday, September 23, 2012

Giveaway from PoppyDreamz

Hey All! Thanks for stopping by today for the kickoff of my blog's one year anniversary celebration! This week I have several great giveaways for you and a few awesome guest posts as well!

So let's get started! The first awesome shop on the list is...


So Gabi...Tell us a little bit about yourself.
I have been married to a wonderful man for nearly 20 years. We have two great kids, a girl and a boy who are also both very creative. We recently moved to a small town and are loving the small-town atmosphere. I love to create! I enjoy painting, sewing, beading, creating mixed media art, and designing on my computer, just for starters!


When did you start scrapbooking?
I’ve always loved playing with paper. From doodling and drawing to cutting and pasting, it just fits in with the whole scrapbooking concept. There have been times when I haven’t been able to find exactly what I wanted in paper design, so I started making my own. Then, when I was telling a friend of mine about my etsy shop (which has only been moderately successful with some of my other creations), she suggested I sell my scrapbook designs on etsy. So, I recently revamped my shop to concentrate on digital products. I’ve listed some of my favorites and have come up with some new designs. Plus I’m getting into cards and invitations as well!


What is your favorite thing in your shop?
Right now (although it changes regularly), my favorite is this…


I saw this beautiful scarf on etsy the other day and got inspired by the gorgeous floral pattern. I put my kids to bed and jumped on my computer. I just really love how it turned out!
What is your favorite way to spend a weekend?
My kids are very active in their sports, and I love to spend the weekends watching their games! I know they will grow up quickly and our time with them is limited so I go to everything I can to watch and support them. Sometimes, I feel I need a weekend for my weekend we get so busy, but I wouldn’t have it any other way!


What's your favorite thing about birthdays?
We go out to eat dinner as a family. Whoever’s birthday it is gets to pick the restaurant. We don’t eat out very often, so it’s always a treat!

Thanks Gabi! Aren't all her digital scrapbook designs awesome?! And now, one lucky person will win a $15 store credit to PoppyDreamz!

To enter this rockin' giveaway use the Rafflecopter form below. Good luck!

Don't want to wait for the giveaway? Use promo code ANNIVERSARY for 10% off your order at PoppyDreamz!


a Rafflecopter giveaway

Wednesday, September 5, 2012

Wedding Gift Packaging

As you may have gathered from my post last week, one of my close friends got married over the weekend. Both Handy Andy and I were in the wedding. In addition to the tissue paper poms I made for the aisle decorations, I also make cake toppers for her cake centerpieces (tutorial coming next week, I promise). Since I was in a crafty mood, I decided to make a special bag for my friend's bachelorette party gift.

Her wedding colors were coral and gray, and I randomly had a plain coral gift bag in my collection of packing materials...perfect!


Here's what else I got:
4.5" x 6.5" decorative paper
White cardstock
White tissue paper
Silver ribbon

First I cut out the top form of the dress and glued it on the decorative paper.


I cut out about 1x1 inch square pieces of tissue paper, crinkled them, folded them almost in half, and then created another fold in the middle.


Then I started gluing the pieces in lines and then layering the lines of tissue paper to make the skirt of the dress.


Once I got the skirt how I wanted it, I glued some silver ribbon to create a belt. 


Then I glued the background paper to the bag, and...


I have a nice gift bag with a wedding dress embellishment on it! This embellishment would also be great for a wedding scrapbook, since that's probably not going to end up in the trash like this bag probably will...it was fun to make anyway!

Have a good one!


Saturday, June 30, 2012

Olympic Event #4: Craft & A Giveaway

Welcome to Event #4 of the Bloggy Olympics! I hope you've enjoyed all the fantastic projects from the other Olympians over the last few weeks! Make sure to stop over to the other Events and check out the winners from each. Also, get your crafting supplies ready if you are planning to participate in this event. You can create a project from one of the three tutorials shared for this event, or make something all your own - as long as it's a craft!

I'm excited to show you my project, so here it is:

Craft:
Coupon Book


If you are going to participate in this even with me, you will need the following gear:
[This looks like a super long tutorial, but I promise it doesn't take too long. I just wanted to provide clear, detailed instructions.]


1. Chipboard or cardboard (a shoe box will do)
2. Envelopes
3. Scrapbook paper
4. Tacky Glue
5. Hot glue gun
6. Mod Podge
7. Scissors or paper cutter
8. Stickers/embellishments (optional)

Alright, let's start with the covers of the book. I used 4.5x6.5 inch chipboard for my covers. You can cut them out of cardboard if you don't have chipboard.

Lap #1: Covers


Step 1: Take the patterned paper you want for the cover, cut a piece large enough to fold over all sides of the chipboard, and then glue one side of the chipboard to the white side of the paper. [I used tacky glue here.]

Step 2: On the other side, fold and glue down two of the opposing sides. For the other two sides, fold down the corners [like wrapping a present].

Step 3: Glue the other two sides with the folded corners. [I used hot glue for this part, to make sure it stays.] Do this for both covers.

Step 4: Cut a piece of patterned paper to glue on the insides of the covers. This will cover up the chipboard and the folds.

Lap #2: Binding

Now on to the binding. I did an accordion-style binding for this, so there is room for stuffing coupons in the envelopes. I measured a piece of chipboard or cardboard to fit the height of the covers (4.5 inches), and 4 inches wide. Then, scored it every half inch and bent it to make the accordion.


Next, I used my hot glue gun to glue the covers to the outsides of the accordion.


To finish off the binding, I cut a piece of paper to wrap around the binding and glue to each cover.


This holds the accordion in so the book doesn't open too wide.

Lap #3: Envelopes

Now it's time to work on the envelopes.


I started by cutting the flaps off the envelopes. Then I glued some patterned paper to the inside of the envelopes -- for decoration and to reinforce them. After that, I used hot glue to fasten the envelopes to the accordion binding.


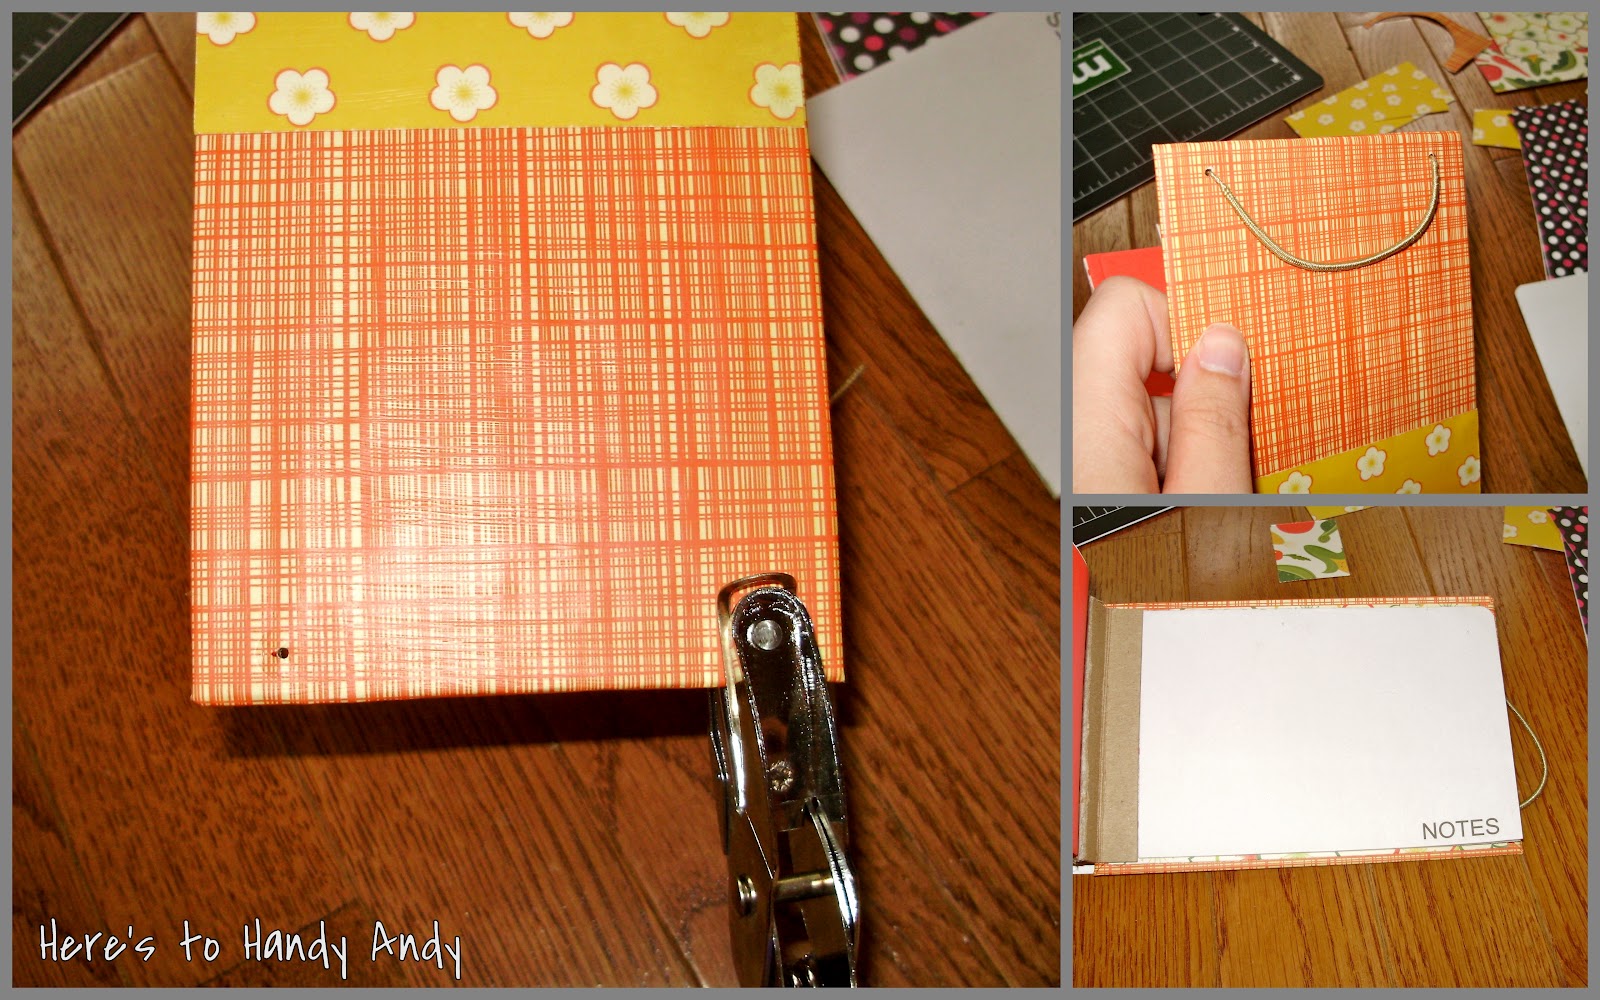
Now, decorate as you please. [I decorated the cover, and added label tabs to the envelops.] Once I was done decorating the covers, I brushed the front, back and binding with Mod Podge to protect it from the dangers it will face while inside the mysterious inner realm of the purse.

Lap #4: Sprint to the Finish

If you wanted, you could be done at this point. [I would recommend using a rubber band to hold the book together in your purse though.] But, I was not about to end this event without giving 100% of my crafting efforts. So, I persevered. [Only a few more steps, I promise.]


To add a built-in elastic band, I used my tiny hole puncher to create two small holes in the back cover. Then I used a skinny hair tie - that's right - and cut it so I had one long string, then threaded it through the holes. I tied knots on each end and hot glued the knots to the inside back cover. Then I glued a note pad to the back inside cover, which conveniently covered up the knots.

Finished!

After all of that, here's how I finished the event:


There you have it! I hope you enjoyed my detailed, albeit long, tutorial. Make sure to head over to C.W. Frosting and Freaking Craft to see how they performed in this event as well. And don't forget to link up your projects for this event on Thursday!

Now that you stuck around to the end of my tutorial, you will be rewarded with a chance to win...


A set of THREE washi tape to one lucky winner from Pretty Tape washi tape. Head over to her shop to take a look at all the fun types she offers! To be entered to win, all you have to do it leave a comment saying which type of tape you like the best in the shop! The giveaway will be open from today through the end of the Event #4 linky party on Friday. I will announce the winner on Saturday with the features from the party.

Thanks for playing along in the 2012 Bloggy Olympic Games!


Friday, October 28, 2011

New Listings!

I normally don't post on Friday, but I'm going to today to show you two new scrapbooks that I listed this week in my shop.

Drum Roll please...


Autumn Leaves Mini Scrapbook Album - you can find it here.


Welcome to the Jungle Paper Bag Album - found here.

There you have it! Also, if you're loving the colors of the Autumn Leaves album, check out Life By the Book on Monday for a little giveaway from my shop!

Have a lovely weekend! And don't forget to check out all the fun at Followers Fest!