***Come link up your crafts to this week's party!***
Showing posts with label mod podge. Show all posts

Wednesday, December 26, 2012

Home State Wall Art

Hello All! Happy day after Christmas! I hope you all had a wonderful holiday! I was pretty productive the week before Christmas so I could do nothing this week. During my productive spurt, I put Christmas projects aside for a little bit and worked on a project that has been on my list for a while.

During the summer I ordered a map of the states both Handy Andy and I were born in, from the years we were born. I intended on framing each of the maps and hanging them in our living room. Unfortunately, my map never made it here, thank you USPS.

I still wanted to do something with Andy's map, so instead of framing it, I decided to make a faux wrap around canvas art piece. Here's what I gathered:


20 x 20 Canvas ($13 at Hobby Lobby)
Map
Mod Podge & Brush

I used an utility knife to cut the map slightly larger than the surface of the canvas. Then I brushed Mod Podge all over the canvas, laid the map on it, and smoothed it out. Before brushing more Mod Podge over the top, I took a staple gun and folded the map around the edges of the canvas and stapled the edges. The I brushed Mod Podge over the map. It bubbled at first, but after it dried everything flatted out. Then I used some black ink and a sponge to ink the edges of the canvas and add a weathered look to the rest of the map.


I used by Cricut to cut out the word HOME with red vinyl. I positioned the letters so that Andy's hometown was in the middle of the O. Then I brushed more Mod Podge over the letters so they would stay.


I love the way it turned out and so does Handy Andy! Plus, we just rearranged our living room and it looks GREAT hung up on the wall. Too bad we don't have a Michigan one for me...

Thanks for stopping by!


Thursday, November 8, 2012

Personalized Notebooks

Hello All! Not sure if you saw my post last week, but I mentioned that I'm going to be trying my hand at homemade Christmas gifts for several of my loved ones this year. I continued crafting for my nieces this week and made them personalized notebooks. These are super simple, but are really cute.

I started with these composition notebooks you can get anywhere, I got them at the dollar store.


I also gathered some scrapbook paper, Mod Podge, and some other embellishments. I used a paper cutter and a knife to cut out the paper for the covers.


I brushed a thin layer of Mod Podge on the notebook before laying the paper down, and then another layer on top of the paper. After that dried I hot glued some matching ribbon to edge of the paper on the binding. Then I used some embellishments to decorate the notebooks for the girls.


Here's how they turned out - I hope the girls like them! I definitely like how simple and cute they are.

Thanks for stopping by!


Thursday, July 5, 2012

Bloggy Olympics Link Party

Did you see the tutorials posted for Event #4? 
Of course you did.
But, just in case, here is a rundown of the crafts that were done by Team Craft of the Bloggy Olympics.


Well, I hope you decided to participate in this event and got your craft on this week. We all worked hard, and now, it's time to party! Link up your craft here, whether you followed one of the tutorials, or did your own thing!

Also, don't forget to enter the GIVEAWAY


Head over there to enter if you haven't yet!

Now link up!


Saturday, June 30, 2012

Olympic Event #4: Craft & A Giveaway

Welcome to Event #4 of the Bloggy Olympics! I hope you've enjoyed all the fantastic projects from the other Olympians over the last few weeks! Make sure to stop over to the other Events and check out the winners from each. Also, get your crafting supplies ready if you are planning to participate in this event. You can create a project from one of the three tutorials shared for this event, or make something all your own - as long as it's a craft!

I'm excited to show you my project, so here it is:

Craft:
Coupon Book


If you are going to participate in this even with me, you will need the following gear:
[This looks like a super long tutorial, but I promise it doesn't take too long. I just wanted to provide clear, detailed instructions.]


1. Chipboard or cardboard (a shoe box will do)
2. Envelopes
3. Scrapbook paper
4. Tacky Glue
5. Hot glue gun
6. Mod Podge
7. Scissors or paper cutter
8. Stickers/embellishments (optional)

Alright, let's start with the covers of the book. I used 4.5x6.5 inch chipboard for my covers. You can cut them out of cardboard if you don't have chipboard.

Lap #1: Covers


Step 1: Take the patterned paper you want for the cover, cut a piece large enough to fold over all sides of the chipboard, and then glue one side of the chipboard to the white side of the paper. [I used tacky glue here.]

Step 2: On the other side, fold and glue down two of the opposing sides. For the other two sides, fold down the corners [like wrapping a present].

Step 3: Glue the other two sides with the folded corners. [I used hot glue for this part, to make sure it stays.] Do this for both covers.

Step 4: Cut a piece of patterned paper to glue on the insides of the covers. This will cover up the chipboard and the folds.

Lap #2: Binding

Now on to the binding. I did an accordion-style binding for this, so there is room for stuffing coupons in the envelopes. I measured a piece of chipboard or cardboard to fit the height of the covers (4.5 inches), and 4 inches wide. Then, scored it every half inch and bent it to make the accordion.


Next, I used my hot glue gun to glue the covers to the outsides of the accordion.


To finish off the binding, I cut a piece of paper to wrap around the binding and glue to each cover.


This holds the accordion in so the book doesn't open too wide.

Lap #3: Envelopes

Now it's time to work on the envelopes.


I started by cutting the flaps off the envelopes. Then I glued some patterned paper to the inside of the envelopes -- for decoration and to reinforce them. After that, I used hot glue to fasten the envelopes to the accordion binding.


Now, decorate as you please. [I decorated the cover, and added label tabs to the envelops.] Once I was done decorating the covers, I brushed the front, back and binding with Mod Podge to protect it from the dangers it will face while inside the mysterious inner realm of the purse.

Lap #4: Sprint to the Finish

If you wanted, you could be done at this point. [I would recommend using a rubber band to hold the book together in your purse though.] But, I was not about to end this event without giving 100% of my crafting efforts. So, I persevered. [Only a few more steps, I promise.]


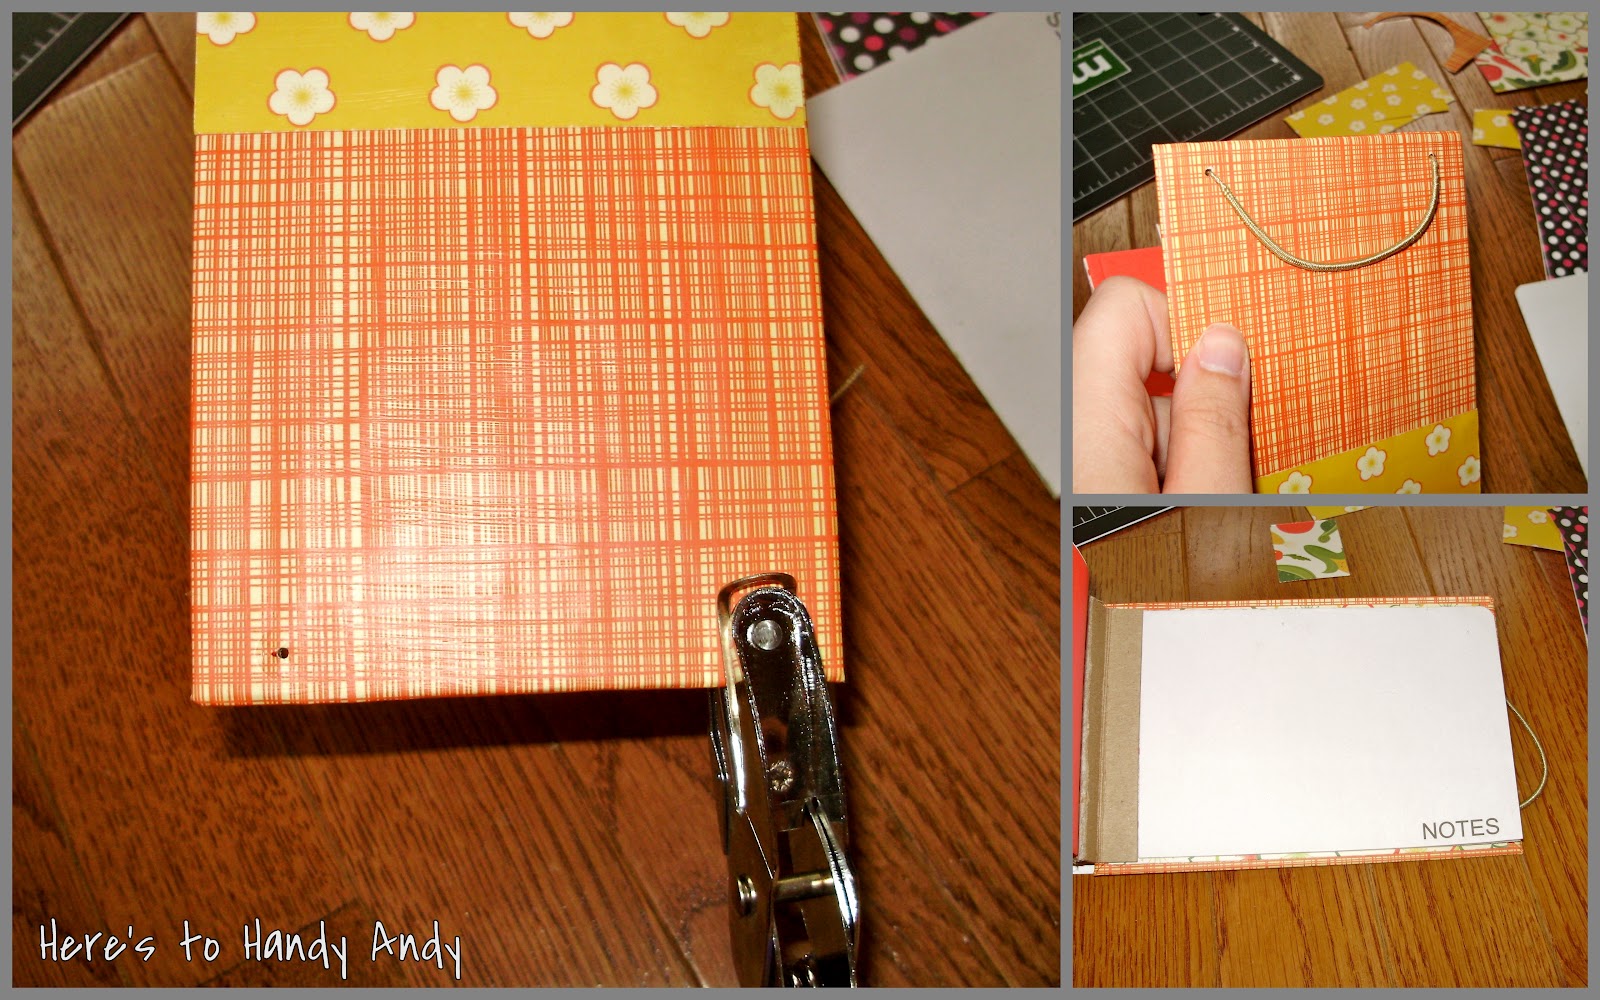
To add a built-in elastic band, I used my tiny hole puncher to create two small holes in the back cover. Then I used a skinny hair tie - that's right - and cut it so I had one long string, then threaded it through the holes. I tied knots on each end and hot glued the knots to the inside back cover. Then I glued a note pad to the back inside cover, which conveniently covered up the knots.

Finished!

After all of that, here's how I finished the event:


There you have it! I hope you enjoyed my detailed, albeit long, tutorial. Make sure to head over to C.W. Frosting and Freaking Craft to see how they performed in this event as well. And don't forget to link up your projects for this event on Thursday!

Now that you stuck around to the end of my tutorial, you will be rewarded with a chance to win...


A set of THREE washi tape to one lucky winner from Pretty Tape washi tape. Head over to her shop to take a look at all the fun types she offers! To be entered to win, all you have to do it leave a comment saying which type of tape you like the best in the shop! The giveaway will be open from today through the end of the Event #4 linky party on Friday. I will announce the winner on Saturday with the features from the party.

Thanks for playing along in the 2012 Bloggy Olympic Games!


Wednesday, June 13, 2012

Patriotic Jar Lanterns

Happy Thursday Everyone! I hope you've stopped over at Hating Martha and Delicate Construction to check out their tutorials for the Bloggy Olympics first Event! If you haven't -- GO NOW!

I decided to participate in this event by doing my own decor project. Well, actually I totally copied this from one of my new favorite blogs: Quinton Wench. Seriously, head over to her blog, you will love it!

Anyway, I few weeks ago Karen from Quinton Wench linked up these Pickle Jar Lanterns to A Pinteresting Link Party.


I absolutely loved them [this project was featured for the next Link Party too]. So, for the decorating event, I decided to try my hand at my own patriotic jar lanterns. I collect pretty much any jar I get, so I had plenty around.

Here's what I gathered:


1. Jars
2. Tissue paper - Red, White & Blue of course!
3. Mod Podge & Brush

First, I cut the tissue paper into smallish squares.


Then I brushed a layer of Mod Podge on the jar, and then layered the tissue paper squares all over, adding another coat on top of the paper as I went along.


That's it! Here's what I ended up with:


Add tea lights...


What I love about these is that they are so quick and easy, plus they cost me nothing because I had everything I needed already! This is a huge plus, because honestly, I'm not big on putting a lot of effort into seasonal decor (except Christmas). These would be great for table centerpieces, decorative accents, or add wire to the top and hang from trees - and they literally took me 20 minutes.

Thanks to Quinton Wench for the inspiration!

Have a great week!


Thursday, February 2, 2012

Clearance Storage Bins

Happy Thursday! Just in case you missed my guest post over at Hating Martha on Monday, I wanted to share it with you. Normally, I wouldn't recycle a guest post this close to the original post, but I am traveling this weekend and just have not had time to put anything together! Also, I think I'm going to change my Thursday posts to general projects instead of specifically doing a Pinterest project. I don't want to be tied only to Pinterest projects to share with you on these days! So here's a non-Pinterest one...

My current project is trying to organize my home office/craft room. I have a lot of junk supplies so I'm using many different types of containers, and I'm trying to be as cost-effective as possible. So, while I was in Hobby Lobby the other day, browsing the clearance section (aka Heaven), I found these:


These perfectly-sized bins were less than $2.00 each, but not quite the look I was going for. I decided on a black and white theme for the storage, but I couldn't pass on the price, so I snatched them up! I got them home and went to work with some black & white scrapbook paper and Mod Podge.


Photobucket


First, I peeled the fake "chalkboard" labels off of the bins. Then, I cut strips of the paper and brushed a layer of the Mod Podge on the bin, layered the paper, and then finished with a final coat of the Mod Podge all over.

Here's how they ended up:

Photobucket


Photobucket

Now they match my organizational decor! I didn't cover the insides, since they will be filled with supplies, but I think they look a lot better. This just goes to show you that you can make pretty much anything work for your room when it's the right price!

I hope you're inspired to browse the clearance section more often!


P.S. I never heard back from Patti, the winner of the lovely handmade headband from The Grant Life, so I had to pick someone else -- Sorry Patti! The lucky second chance winner is...#3 Erin who said:

Linking up here:


Photobucket


button

life by the book